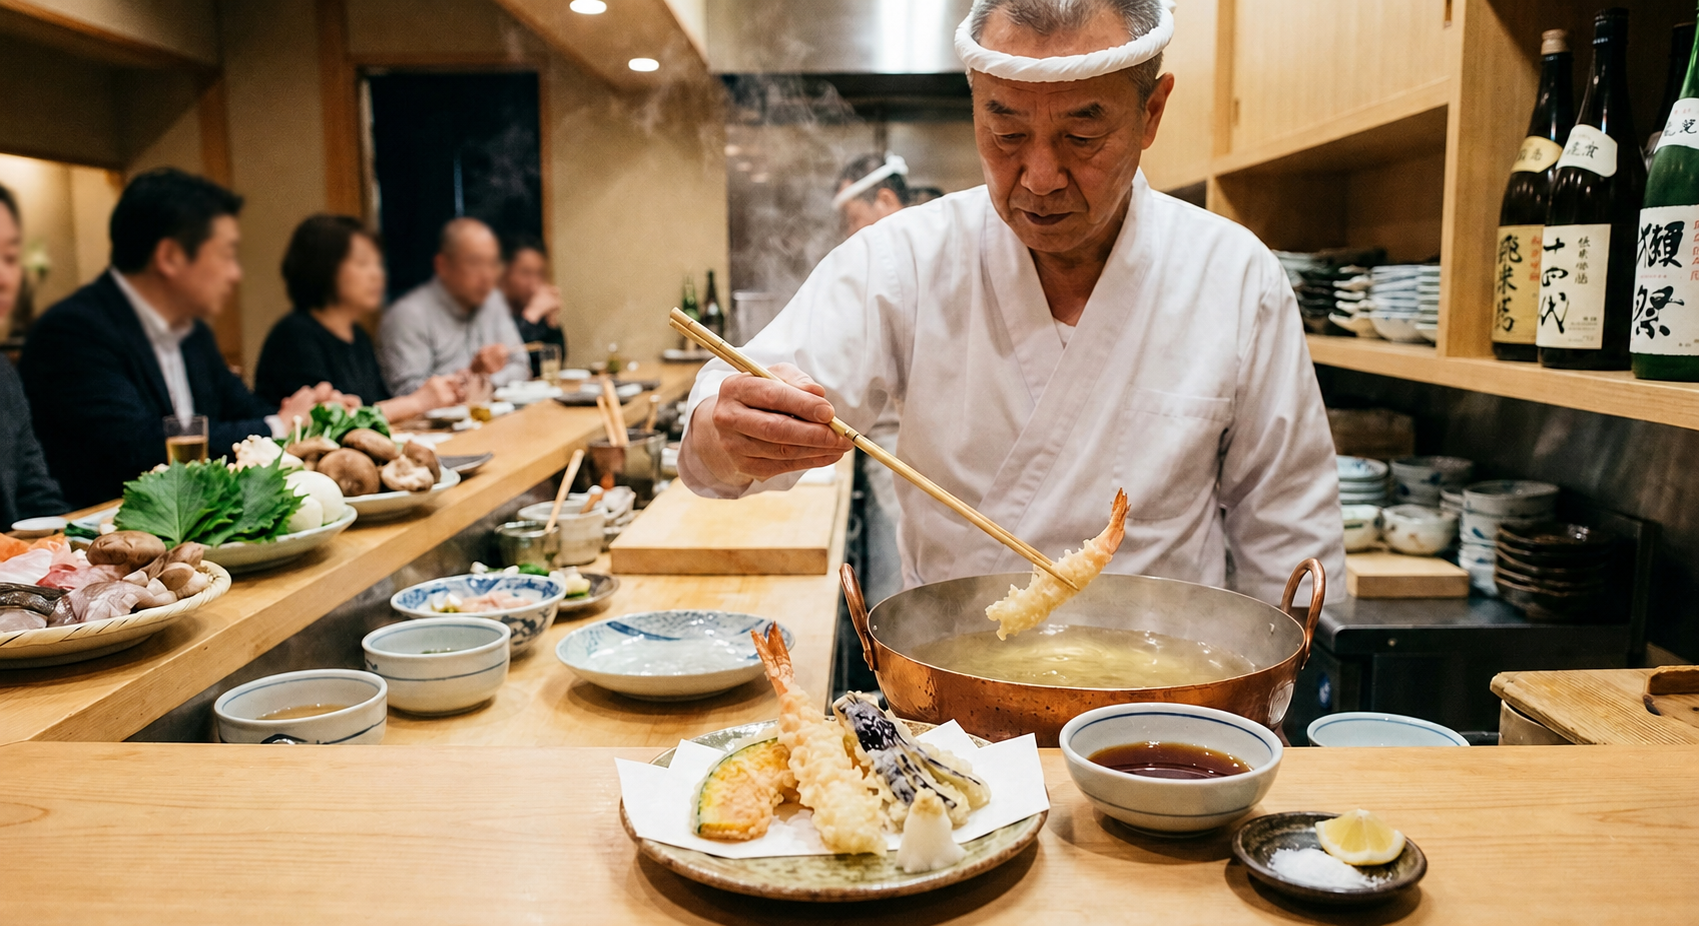
Tempura is seafood, vegetables, or other ingredients coated in a light batter and fried so the exterior becomes crisp while the inside retains its own moisture and character. The technique looks simple, but the result depends on ingredient preparation, batter temperature, oil control, timing, and immediate service.
It is therefore misleading to define tempura as merely “Japanese fried food.” Good tempura is designed around contrast: a thin shell against tender fish, a crisp edge against sweet onion, or a lightly browned coating around steaming seasonal vegetables.
Tempura Cooks the Ingredient in Two Ways at Once
The hot oil sets and dehydrates the batter while heat turns moisture inside the ingredient into steam. A skilled cook balances these processes so the coating does not become greasy before the center is ready.
The Ministry of Agriculture, Forestry and Fisheries describes tempura as a test of moisture control in The Washoku Way: the exterior should be crisp while the ingredient remains tender and moist. This explains why identical batter and frying time cannot be applied to shrimp, asparagus, and sweet potato.
How Tempura Developed in Edo
Fritter-like cooking associated with Portuguese contact is often discussed as an early influence, but the recognizable Edo style developed under Japanese conditions. Wider production of cooking oil and the growth of food stalls helped tempura become popular in Edo.
According to MAFF’s official history of Tokyo tempura, seafood from Edo waters was battered and fried in sesame oil, then eaten hot at street stalls. From the late Edo period into the Meiji era, techniques were refined and tempura restaurants helped establish the dish as both popular food and high-end cuisine.
This history survives in the term Edomae tempura, which often emphasizes seafood associated with Tokyo Bay, sesame oil, and service piece by piece while hot.
The Batter Should Protect, Not Dominate
A basic batter uses flour, cold water, and often egg. The cook mixes it lightly rather than developing the strong gluten structure desired in bread. Small lumps are not necessarily a defect. Overmixing can create a heavy, bready shell.
Ingredients are dried and may receive a light dusting of flour before entering the batter. Excess surface water can disrupt adhesion and increase dangerous splattering. The batter is usually prepared close to frying time because temperature and resting affect its behavior.
Oil Temperature Follows the Ingredient
| Ingredient characteristic | What the cook needs to manage | Typical risk |
|---|---|---|
| Thin leafy vegetables | Very short frying time | Burning before service |
| Shrimp or small fish | Set batter while keeping flesh moist | Rubbery seafood |
| Root vegetables | Longer heat penetration | Dark coating with a raw center |
| High-moisture vegetables | Steam release and surface drying | Soggy coating or splatter |
| Kakiage clusters | Even binding and internal cooking | Dense, oily center |
MAFF’s regional cuisine page gives approximately 160–180°C as a broad frying range, but professional cooks adjust temperature and time for each item. Sound, bubble size, batter color, and the movement of the ingredient all provide feedback.
From the Fryer: Tempura as “Steaming in Oil”
At the fryer, I do not think of tempura as an ingredient simply submerged in oil. I think of it as a brief steaming process protected by a shell. The hot oil sets the batter and drives moisture from its surface; at the same time, water inside the fish or vegetable becomes steam and cooks the center. The cook’s task is to stop at the point where the shell is crisp but the ingredient has not surrendered the moisture that makes it taste like itself.
This way of thinking changes every decision. A shrimp and a slice of sweet potato may enter the same pot, but they do not need the same batter, oil temperature, or time. Even two shrimp from the same box can behave differently if one is larger, colder, or wetter. Numbers help me establish a range; the ingredient tells me when the work is complete.
How I Read Sound, Bubbles, and Movement
The fryer is constantly giving information. Immediately after a moist ingredient enters the oil, the sound is broad and forceful because water is escaping rapidly. As frying progresses, the sound usually becomes finer and lighter. Large, vigorous bubbles often give way to smaller, more even bubbles. I also watch how the ingredient rises, how the batter opens, and whether its movement in the oil becomes calmer.
| Cue at the fryer | What I notice | What it suggests |
|---|---|---|
| Sound | A heavy bubbling sound becomes finer and higher | Moisture is leaving more slowly and the piece is approaching its intended finish |
| Bubbles | Large, irregular bubbles become smaller and steadier | The first intense release of steam has eased |
| Batter | The coating sets, opens, and stops looking wet | The shell has developed enough structure to protect the ingredient |
| Movement | The piece floats or settles into a calmer rhythm | Its internal moisture and buoyancy have changed |
| Resistance | Chopsticks feel a firmer shell or a lighter vibration | The exterior is crisping, though the center still requires separate judgment |
These cues are more useful together than alone. A quiet fryer does not automatically mean that seafood is safely cooked, and a brown coating says little about the center. At a professional counter, sensory judgment is supported by consistent portioning, ingredient temperature, oil volume, and the restaurant’s food-safety controls.
Why the Oil Blend Changes the Finish
The oil is part of the seasoning. A pale sesame oil such as taihaku goma-abura, made from unroasted sesame seeds, can give body without the pronounced toasted aroma of darker sesame oil. A small proportion of fragrant roasted sesame oil can deepen aroma and color, while cottonseed or another neutral oil may make the finish feel lighter. Each shop develops its own balance according to the ingredients, desired color, frying temperature, and how quickly the courses are served.
I judge an oil not only by the first aroma but also by the aftertaste. If the coating feels heavy after several pieces, the problem may be old oil, a poorly matched blend, falling oil temperature, overcrowding, or batter that retained too much oil. The cleanest tempura leaves the flavor of the ingredient after the crisp sensation has disappeared.
Batter Temperature, Mixing, and the Way It Is Applied
Cold egg-water and cool flour are a dependable way to slow gluten development. I combine them shortly before frying and mix with chopsticks in a cutting motion. A few small lumps are preferable to a smooth, elastic batter. Once the mixture becomes stretchy, the coating tends to fry thick and bread-like rather than fragile and crisp.
Cold batter is a method, not a ritual that replaces observation. Room temperature, batch size, flour condition, and the heat carried by the bowl all affect viscosity. During service I watch how the batter falls from the chopsticks and how it clings to the ingredient. If it sits like paste, it is too heavy for a delicate fish; if it runs off completely, it cannot form a protective shell.
- Kuruma ebi and kisu: I use a particularly light coating so the color, shape, and fine texture remain visible. The batter should support the seafood rather than announce itself first.
- Anago: A slightly more substantial coating, sometimes with scattered extra batter to create hana or crisp “flowers,” can stand up to its moisture and broad surface.
- Shiso: Unlike anago, shiso generally needs an extremely light coating, often mainly on one side. This protects its green color and aroma and prevents the leaf from becoming a thick, batter-dominated chip.
Three Decisions I Make for Specific Ingredients
Kuruma Ebi: Crisp Outside, Juicy at the Center
For kuruma ebi, a professional starting range may be around 175–180°C, but I never treat a figure such as 30 or 40 seconds as a universal answer. Size, starting temperature, preparation, oil depth, and the number of pieces in the pot can change the result. I am looking for a fine shell, a resilient bite, and concentrated sweetness rather than the dry, tight texture caused by overcooking.
Some specialist counters deliberately aim for a translucent, very juicy center under controlled sourcing and food-safety procedures. That restaurant technique should not be copied at home by relying on a stopwatch. The head is a separate job: after removing or controlling moisture, it is cooked more thoroughly—often in a hotter phase or for longer—until the shell and legs are crisp and aromatic. This is high-temperature frying, not “high-pressure” cooking, and it requires particular care because trapped moisture can cause violent splashing.
Anago: Crisp Skin and Steam-Softened Flesh
Anago contains enough moisture that the fryer can sound unusually active. One approach I use is to lower it skin-side first so that side firms and becomes aromatic while steam cooks the flesh within the batter. A temperature near the upper end of the normal tempura range may work, but the thickness and condition of the fish matter more than a fixed 185°C rule.
As the sound becomes finer, I feel the shell with the chopsticks and watch the bubbles along the center of the fillet. The ideal contrast is a shell and skin that break cleanly with a light crackle while the flesh separates softly. If I chase color alone, the surface can become dark before the center reaches the right texture.
Whole Sweet Potato: Low Heat, Time, and Residual Steam
A thick or whole sweet potato requires the opposite rhythm. In a specialist setting, I may use a low-temperature, long fry—often somewhere around 150–160°C and, depending on size, 30–40 minutes or more. The slow passage of heat gives the potato time in the temperature range where its enzymes help convert starch into maltose, developing sweetness instead of merely browning the exterior.
After it leaves the oil, the cooking is not necessarily finished. Resting allows residual heat and steam to even out the center. The result can resemble an intensely sweet baked sweet potato inside a delicate fried shell. This method depends on the variety, diameter, moisture, and commercial fryer setup; cutting into a very large piece is the only reliable way to confirm its actual center, and home cooks should use a tested recipe designed for their equipment.
What the Guest Does Not See
From the counter, a piece of tempura can appear effortless: batter, oil, a few seconds, then salt. From the fryer, it is a chain of small corrections. I dry the surface, choose the thickness of the batter, allow for the ingredient’s temperature, protect the oil temperature from a sudden drop, listen for the change in moisture, and decide whether the piece needs immediate service or a brief rest.
That is why tempura is best understood as a dialogue between heat and water. The technique is successful when the guest notices the sweetness of shrimp, the fragrance of shiso, or the softness of anago before noticing the oil.
Classic Ingredients Reflect Season and Place
Common seafood includes shrimp, squid, sillago, conger eel, scallop, and small seasonal fish. Vegetables may include eggplant, lotus root, pumpkin, sweet potato, green beans, mushrooms, shiso, and young bamboo shoots.
A meal does not need every famous item. Specialist restaurants often build a sequence around what fries well that day. The same seasonal attention appears across washoku, where time of year is communicated through ingredients, cooking, tableware, and temperature.
Tempura, Kakiage, and Other Fried Foods
Kakiage is a cluster of small pieces—often vegetables and seafood—bound with batter and fried together. It belongs to the tempura family but creates a denser network of crisp edges than one battered ingredient.
Tonkatsu uses breadcrumbs around a pork cutlet, while karaage commonly relies on seasoning and a flour or starch coating without tempura batter. The distinctions involve preparation as well as appearance; not every pale fried item is tempura.
How Tempura Is Served
Tempura may be served piece by piece at a counter, together on a plate, over rice as tendon, or beside soba and udon. At a specialist counter, eat each piece soon after it arrives so the coating does not absorb steam from the interior.
Common seasonings include salt and tentsuyu, a dipping sauce commonly built from dashi, soy sauce, and mirin. Grated daikon may be added to the sauce. The restaurant may recommend salt for a delicate item and sauce for another, but preferences and house styles vary.
A Practical Eating Order
Begin with lighter vegetables or white fish, move toward shrimp and richer items, and leave substantial root vegetables or kakiage for later. This is not mandatory etiquette; it simply prevents a strongly flavored or dense piece from overwhelming a delicate one.
Taste the first bite before adding seasoning. If salt is offered in several flavors, use a small amount. With tentsuyu, dip briefly rather than soaking the entire coating.
Home-Frying Safety Matters More Than Restaurant Style
Water and hot oil are a dangerous combination. Dry ingredients, use a stable deep pot, avoid overfilling, and keep children and loose clothing away from the stove. Never pour water onto an oil fire. Follow the fryer, oil, and local fire-safety instructions applicable to your kitchen.
Cook seafood and other potentially hazardous ingredients to safe temperatures under current local guidance. The U.S. Food and Drug Administration advises cooking most seafood to an internal temperature of 145°F (63°C); local rules may differ. A crisp coating, quiet frying sound, or browned exterior does not prove that the center is fully cooked.
What Defines Excellent Tempura
Excellent tempura does not hide an ingredient under batter. It creates a temporary crisp shell, concentrates aroma, and delivers the interior at its best temperature. Understanding moisture and timing explains why tempura can range from an everyday supermarket side dish to a course-by-course craft at a specialist counter.
Continue With Seasonal Ingredients
If this article deepened your understanding of Japanese food culture, you can support Japan Food Compass on Ko-fi and help us continue sharing carefully researched guides and original kitchen stories.